
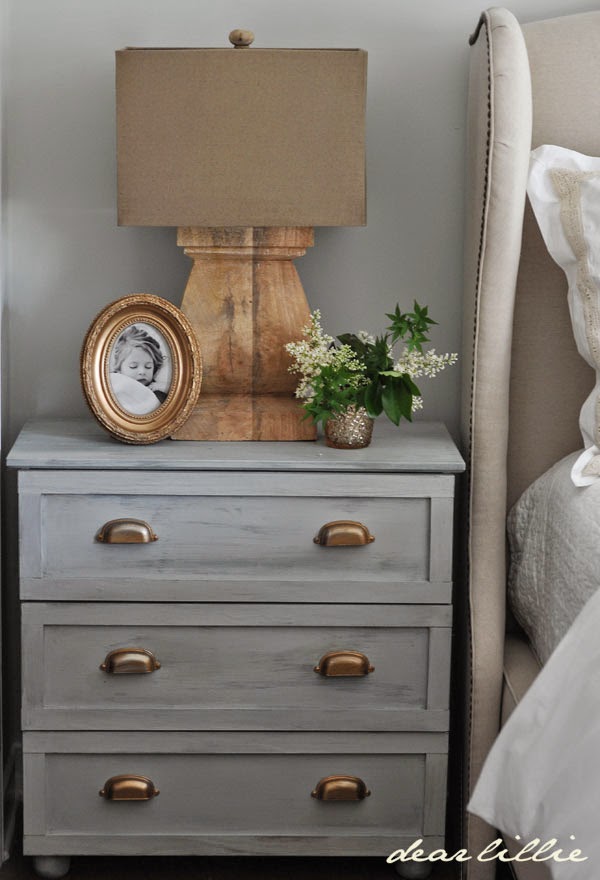
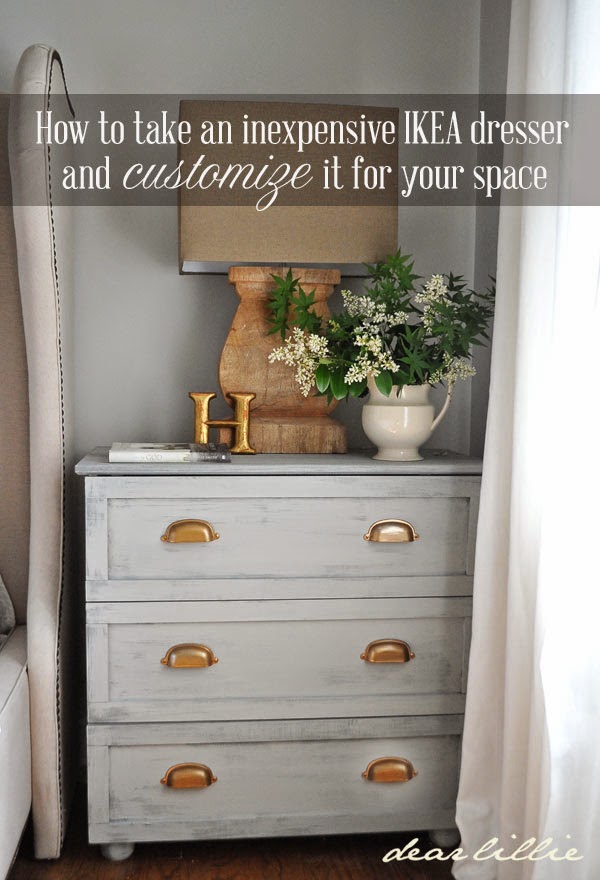
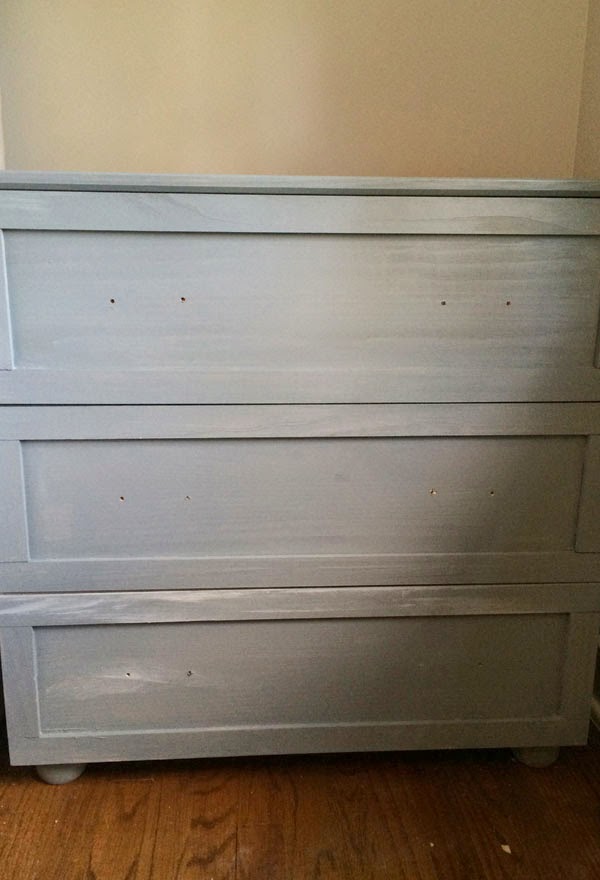
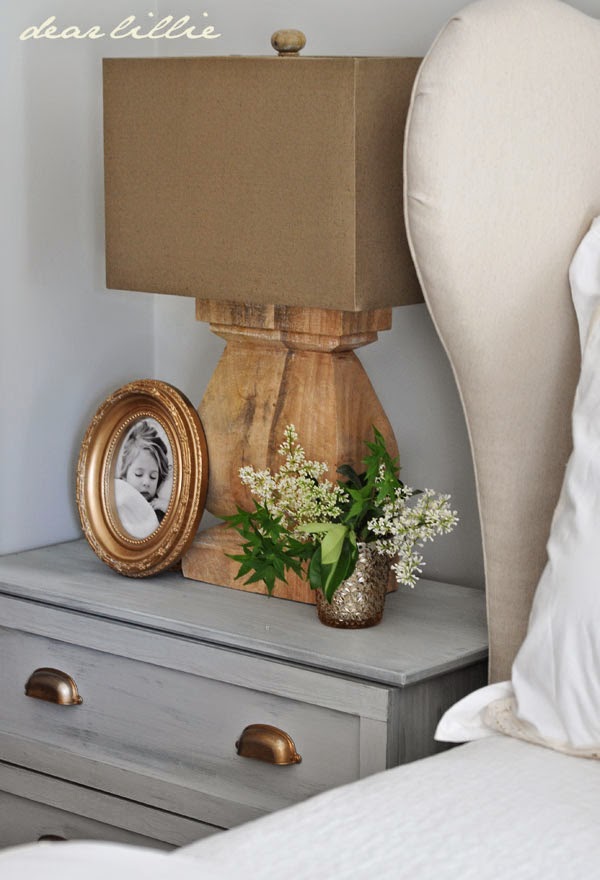
When we finally got around to making over our master bedroom a couple of months ago we decided to switch to a king-sized bed and we moved our other queen sized bed into the guest bedroom and slept with our new mattresses on the floor for quite a while so we just kind of used the floor as a nightstand. =) Then we ordered a bed from Ballard Design (which I will show you lots of pictures of next week) and once it arrived we needed to figure out some kind of nightstand option. We didn’t want to spend very much money but still needed something substantial to look proportionate with the size of the bed. I hunted and hunted but had trouble finding something the right size that wasn’t way more than I wanted to spend. I ended up giving up on finding something and decided to go with the the inexpensive IKEA Tarva dresser and customize it to look a little bit more our style. Even though technically it is a dresser, it is the perfect size nightstand for our room. Here are a few photos of the end result and then if you scroll down I will show you what it looked like when we started and how we transformed it. (I think they look a little more distressed in these photos than they do to me in real life for some reason).
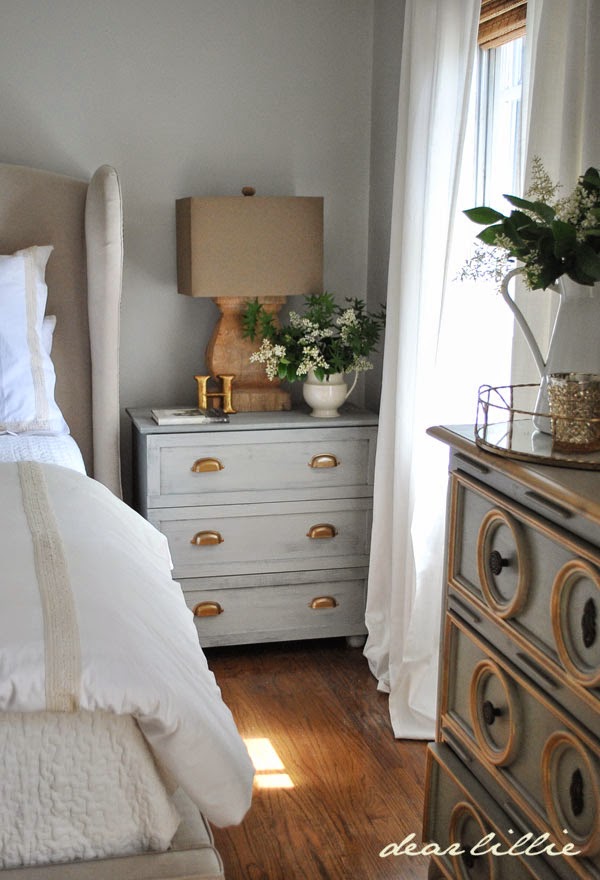

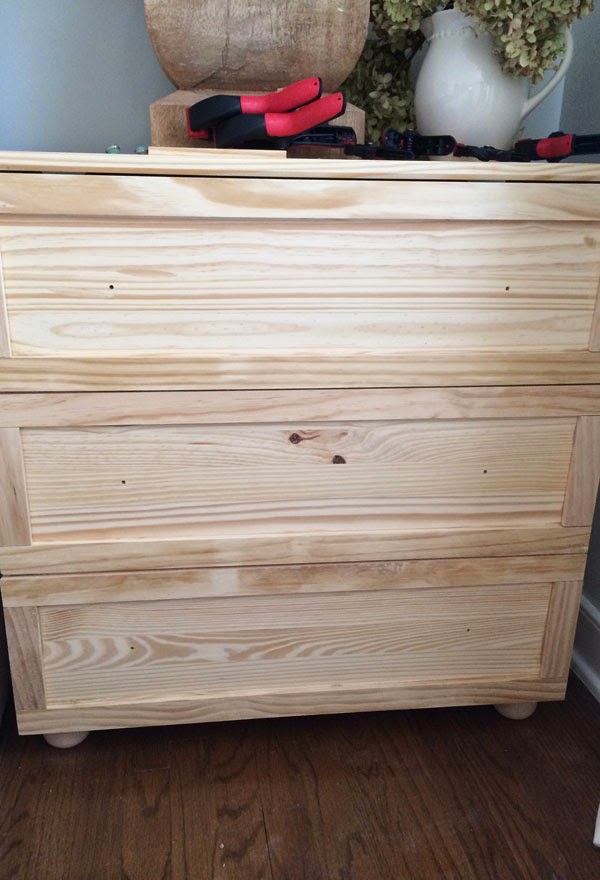
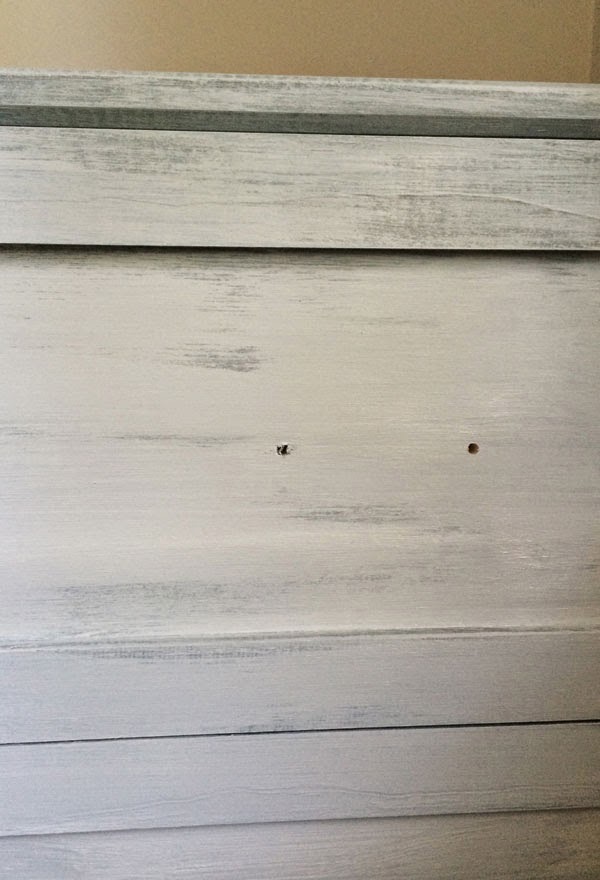
Okay, so here is what is what we were working with:
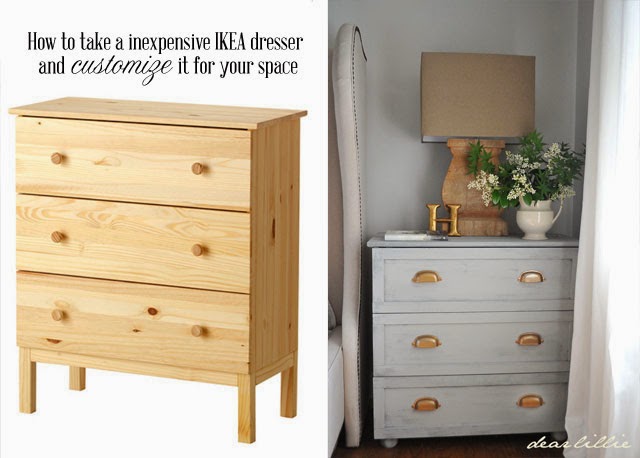
The first part of the project was putting together the Tarva. And I am not going to lie. I am not a fan of putting together IKEA furniture. I hate it. And I would also add I probably am least impressed with this piece as far as IKEA pieces go. I actually am planning on writing a post in the near future about all of the different IKEA items we have purchased over the years and what we have been happy with and what we would recommend (because there are several pieces I absolutely love) and what items I have not been as thrilled with. Anyway, because of the drawers this piece took a little while and it’s a little bit on the flimsy side. Once I got to the part where you add the legs I skipped that step. The legs on it would have made it a little taller than I wanted next to the bed plus I thought it would look a little better with some little bun feet. In retrospect I wish I had gone with a larger size and may switch them out at some point but you don’t really notice them once you are further back so I may never get around to it. To add the bun feet I first attached these:
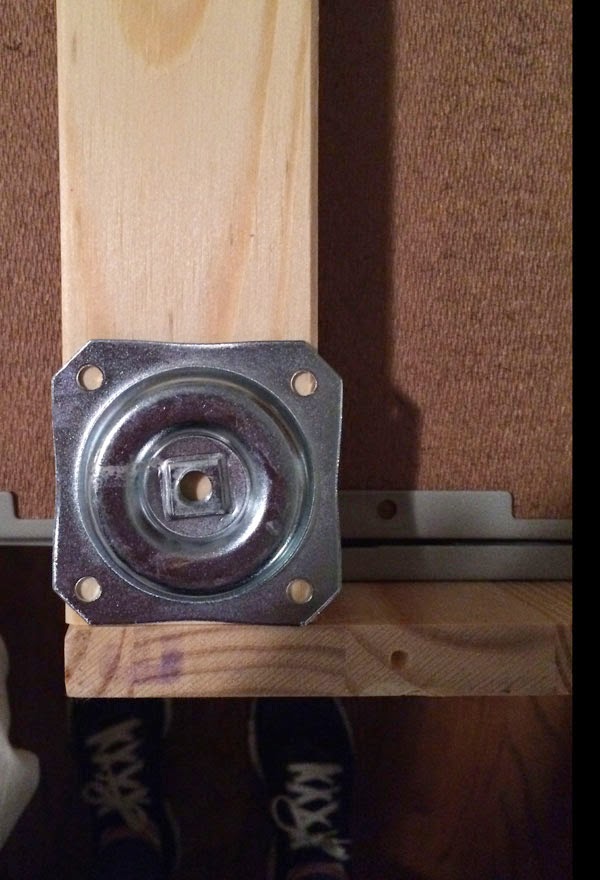
and then just screwed the feet in:
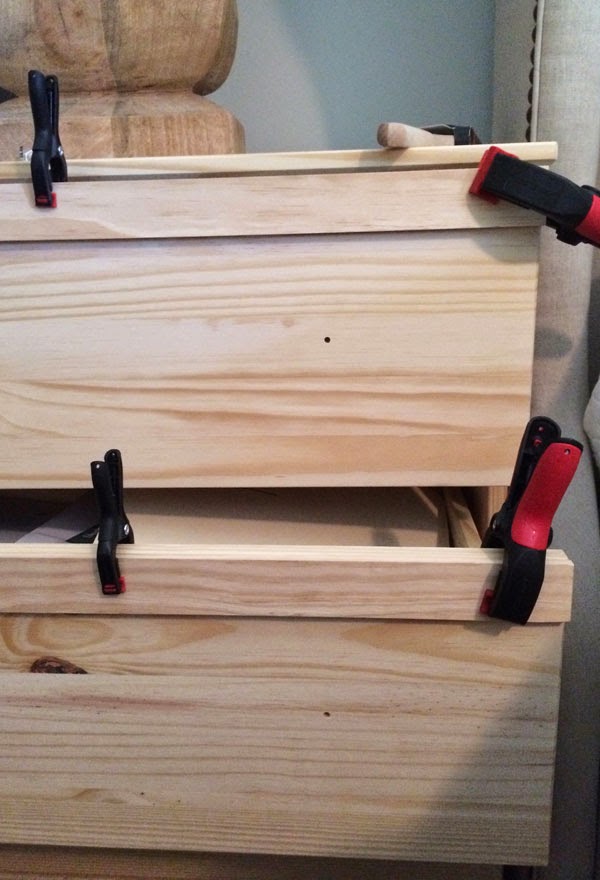
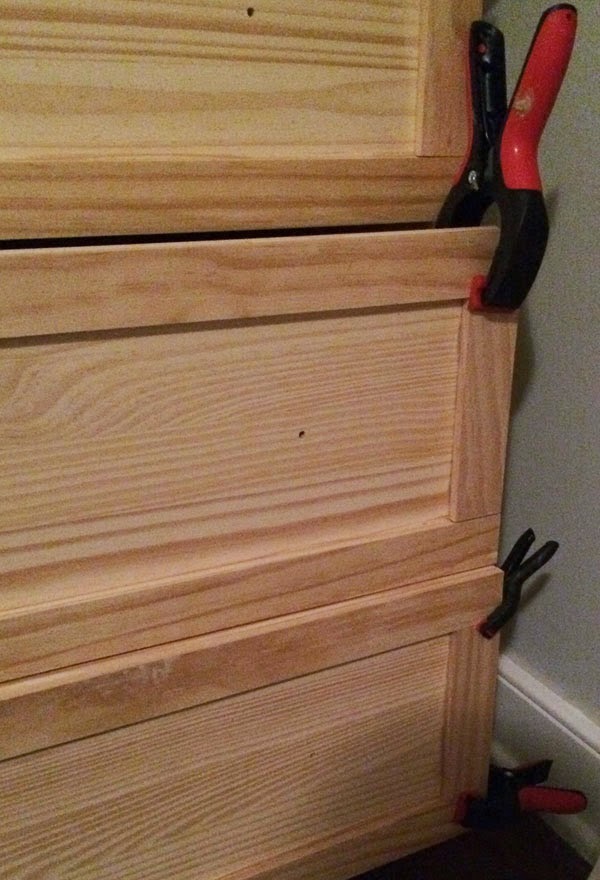
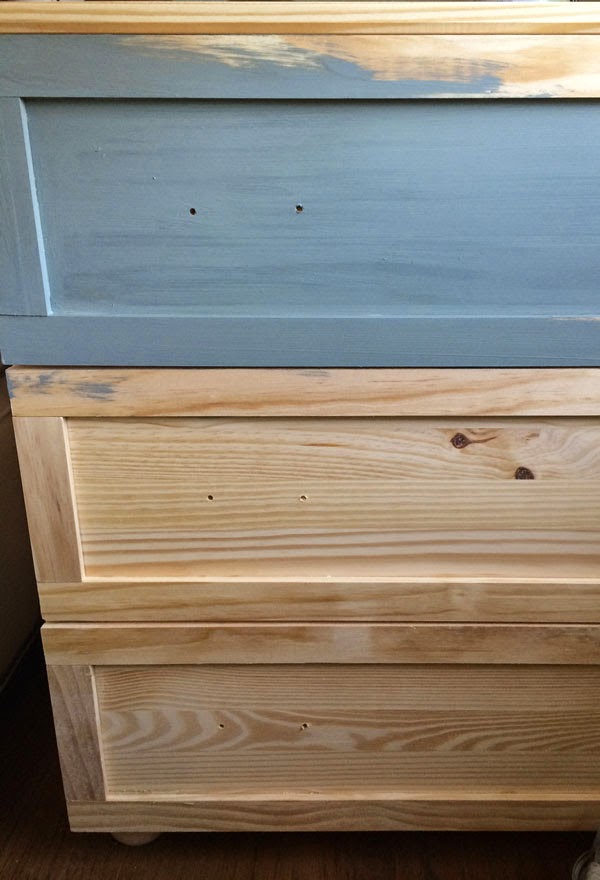
Then I used liquid nails and added some thin pieces of wood to sort of frame out each drawer. I used clamps to hold them in place until the liquid nails dried. First I did the long pieces:
And then I added the side pieces – I measured each one of the side pieces separately seeing how the drawers themselves weren’t “perfect”
So here is what it looked like at that point. Not perfect and nothing too fancy but definitely a little bit more grown up feeling than the original piece.
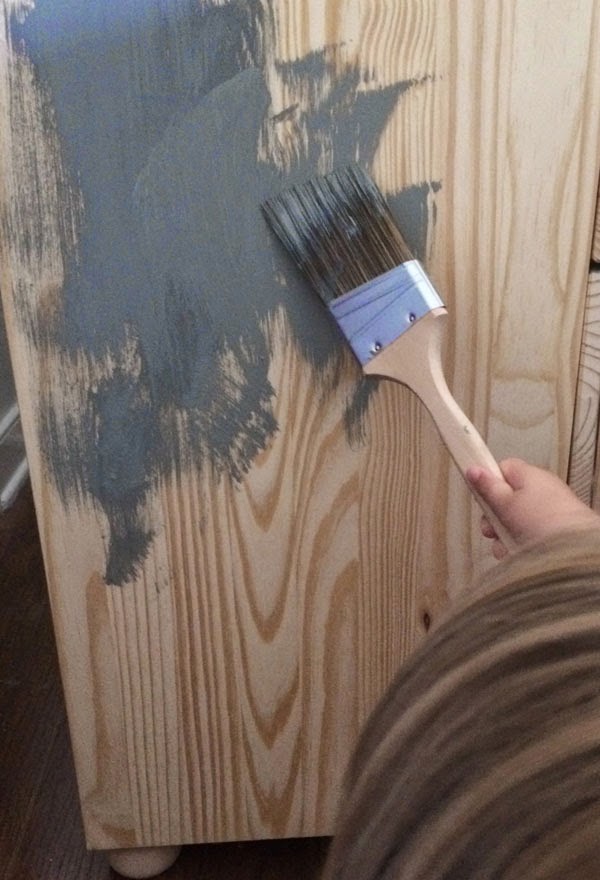
Next I painted it. I just used some sample sized colors from Benjamin Moore. First I coated it with Duxbury Gray. I haven’t sealed mine yet but at some point will probably use some Annie Sloan Clear Wax on them.
Lola helped me with the sides. =)
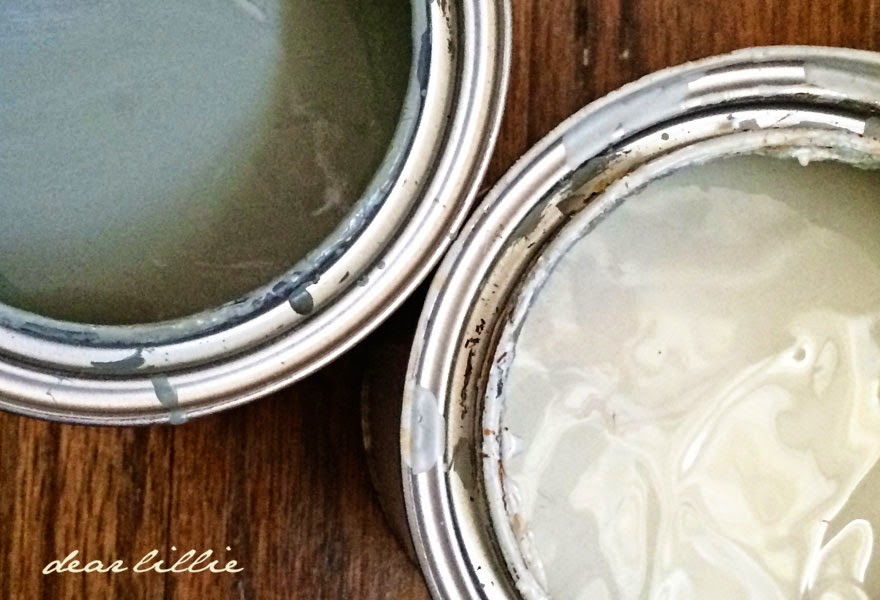
The Duxbury Gray is on the left. It was a little darker than I wanted so then I added some Sea Haze that I had an old sample from ages ago.
While the Duxbury Gray was still wet I brushed on the Sea Haze:
I wanted the finish to have kind of a rough aged look (they look a lot more distressed in these photos than they do in real life though):
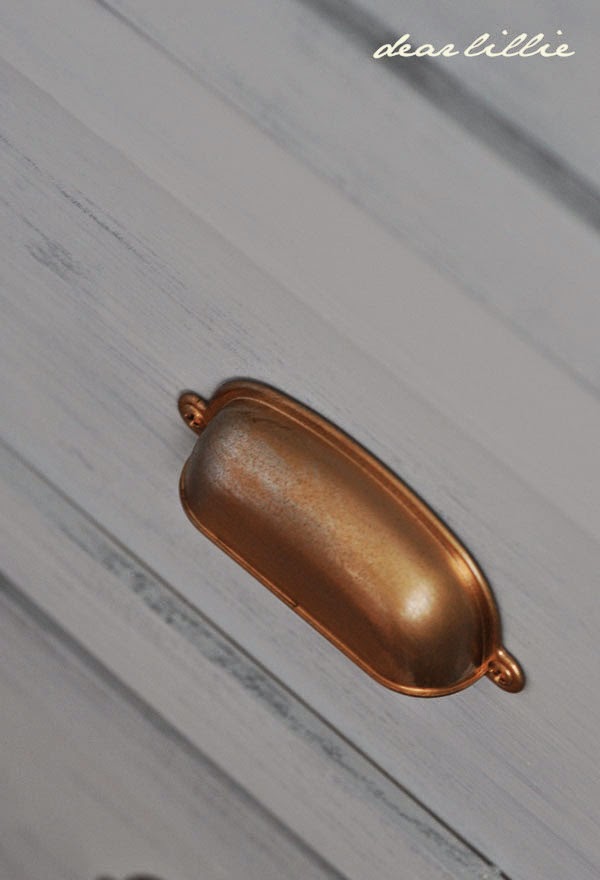
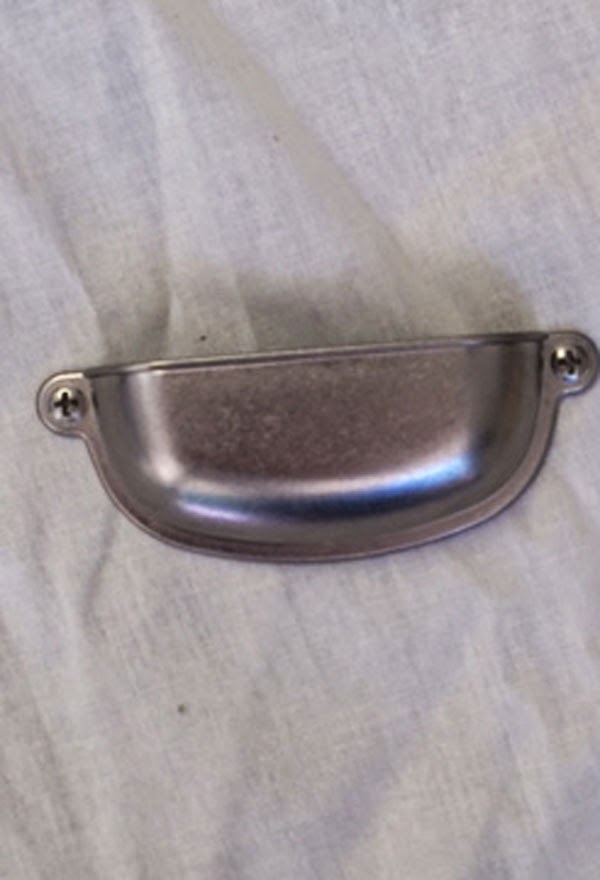
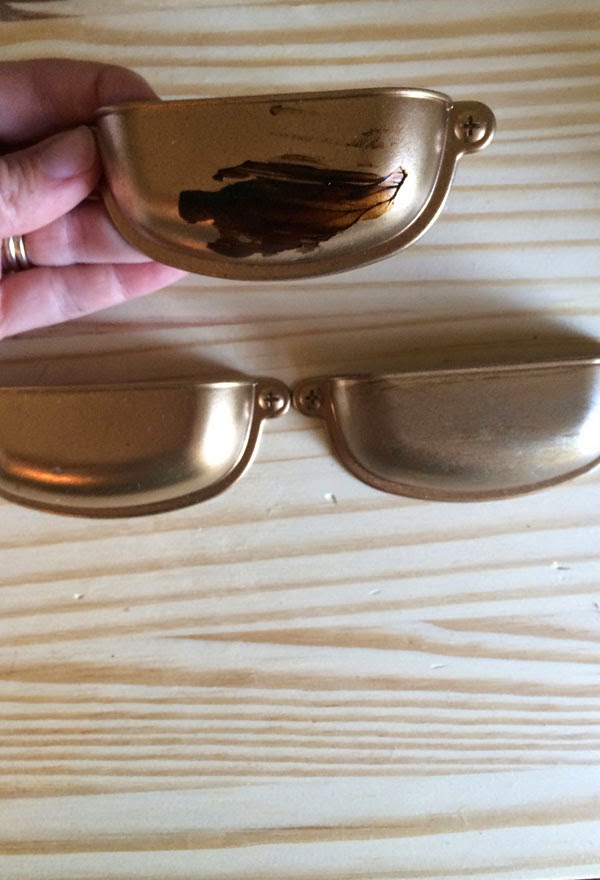
Once that was dry I added some extra holes for the hardware and then found these Martha Stewart Cup Pulls at Home Depot. I couldn’t find any that had kind of an antique gold or antique brass look to them so I just bought these seeing how I at least liked the shape of them.
This is what they looked like to start with (If you are looking for this type of finish I would recommend these – they were quite nice – it just wasn’t the color I was looking for to go with the rest of our master bedroom):
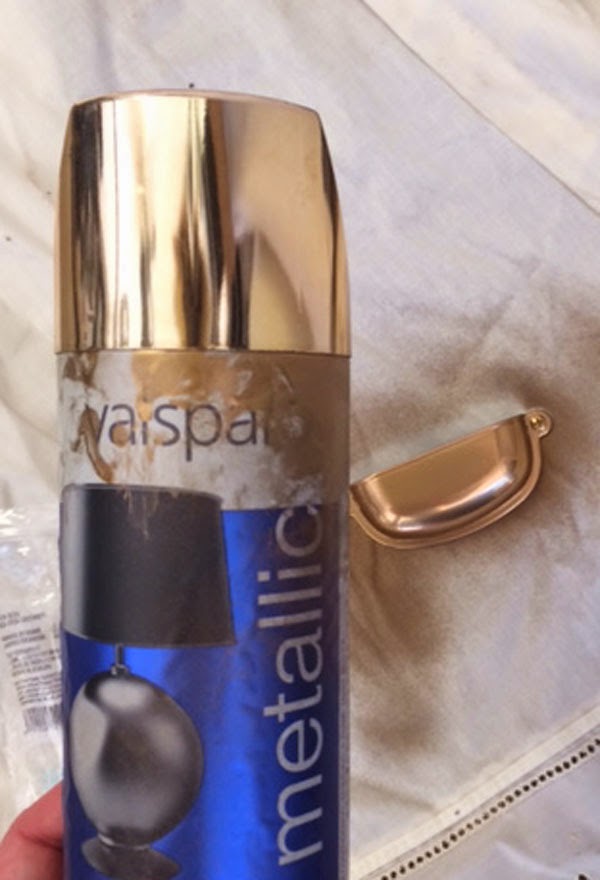
So I sprayed them with this gold color:
And then gave them a really light misting of an oil rubbed bronze spray too and then after that rubbed some Annie Sloan Dark wax over real quickly then wiped it off. You can see in the two below the one on the left was just with spray paint and the one on the right has the wax. It helps give them more of an aged look.
And then I just screwed those on and there you have it. So, it definitely took a decent amount of time to do two of these but all in all it was a pretty easy project!
Source List:
Wallcolor – Moonshine by Benjamin Moore in Matte
Trim – Simply White by Benjamin Moore in Semi-gloss
Nightstand – Made over from a Tarva dresser from IKEA and painted first in Duxbury Gray and then Sea Haze
Pulls – Martha Stewart from Home Depot (spray painted gold and aged with Annie Sloan Dark Wax)
Lamps – HomeGoods
Gold Oval Frame – have had for years
Little Gold Vase – was originally a candle from Target, once it finished we now use it as a vase
Bed – Ballard Design
Euro Shams and Regular Shams – Ballard Design
Coverlet and little pillow in front – IKEA
Drapery Panels – IKEA
Pitcher being used as vase – gift (from Spring Mill)
H – gift
I hope you all have a fabulous Tuesday! I’ll be back some photos from Jason’s house and a new product later this week!


Jenni, you are BRILLIANT. Your nightstands look terrific! I love the way you chose these pieces based on proportion and your imagination of what they could be. I especially like the way you nixed the skinny legs for bun feet, and the pulls look really cool. As always, you've done a great job! 🙂
This project is Amazing!!..We recently just got a new bed and it is super high…I'm still searching for nightstands myself. We need at least 30" or 31" nightstands.Do you know the height of the the dresser with the bun feet?
Thanks, Denise! The dresser was 36" with their legs so with mine I'm guessing its between 32-33 inches.
Great makeover! The nightstand looks much better now – you are a very creative woman:)
They look FABULOUS!!!!
Wow, the dressers now turned into nightstand is genius!! They look great with your other furniture piece that you bought for your room earlier this year. Can't wait to see the whole room!! Your almost coming up on a year in your new home, right? Or is it already been a year earlier this month? Follower in Md. Shawn
Thanks so much! And yes, it will be a year in our new home in another week!
Love the dresser and I've been searching for lamps like that. I tried HomeGoods to no avail. Do you have any additional information about them you can remember? Thanks
Thanks! Unfortunately I don't have any more info 🙁 I didn't save the tags, so I don't even have the brand to pass along!
The finished product is beautiful.
i really like how the nightstand came out…ive been working on my kitchen using IKEA cabinets…put them all together all by myself….learning experience but not bad…i like them. my question for you is….how do you like using the annie sloan clear wax as compared to a satin polyurethane??
Thank you! I can't really compare the two, as I don't use polyurethane all that often (although I think there are some bloggers who have written about the pros and cons of each in the past), but I've been very happy with the Annie Sloan wax every time I've used it.
Wonderful tutorial! You nightstand looks high end! LOVE Lola's painting. Nothing like starting young!
Amazing 🙂
Jennifer,
You never cease to amaze me! As always, your nightstands are divine.
I’ve been wanting to add trim to my cheap laundry room cabinets but wasn’t sure how to attempt it. You make everything look so easy! I’m definitely inspired.
I’m wondering, though, the type and size of wood you used for the trim?
Thanks for a great tutorial.
Patty
You are so sweet, Patty! And I just grabbed the thinnest pieces I found at Lowe's. I am not sure what the sizing on them was. Next time I am out there I will look and see what they were called! They were about 50 cents for a strip so you could probably bring a few home to try to see what size works best for your cabinets.
So glad this post popped up in my newsfeed! We too, have a king size bed and I have been on the hunt for a small dresser to use as a nightstand, but keep hitting roadblocks when is comes to price. Looks like a trip to Ikea is in my future!
These look amazing. I love looking at your blog!
gorgeous! as usual!!
I've never purchased anything but a rug from Ikea. It is the one thehouseofsmiths.com have in their entryway…. I decided I'd like to have it in mine, too. Well, I am not impressed & wondered if all Ikea products are flimsy, so I am watching for your post.
My girls want bunk beds so bad & I just bought 2 antique French Provincial twin beds for their room, so I really don't want to change them! However, I remember being a kid & wanting a bunk bed SO BAD & didn't get one….. ha! I thought about buying some from Ikea, but they are ugly. I am brainstorming a hack for them & scouring the internet. Another blogger I love just bought her twins the bunks from there, but she left them as is. It goes well with her decor though. I asked if they are sturdy, but haven't heard back yet. I'm just so torn!
What do you think? Pack up the FP twin beds & go with some bunks? {& pray they miss their little twin beds being side by side!} 🙂
You are so gifted! I enjoy every visit here, and am continually amazed at how you can take the simple and inexpensive and magically make it beautiful! I leave each time, so inspired. Thank you!
I am an mother of three grown daughters, and I enjoy what you shared about your two adorable daughters. Brings back memories for me.
Thank you so much! That is so sweet of your to say–it must have been so much fun having three girls!
so pretty !!
ESPECTACULAR EL CAMBIO , DE PATITO FEO A CISNE !!!!Muchas gracias por el tutorial
Love! What finish of the paint did you use (semi gloss, etc)?
Thanks! It was a sample can, so no finish 🙁
Looks fabulous! Do you mind sharing the size of the boards that you added? Thanks so much!
Thanks! I just grabbed the thinnest pieces I found at Lowe's. I am not sure what the sizing on them was. They were about 50 cents for a strip though.
I love these nightstands. I am thinking of doing something similar. Could you tell me where you found your bun feet? Thanks in advance.
Thanks, Amanda! We got them at Lowe's.
This is so beautiful! I am planning on purchasing the Tarva for a shared nightstand/dresser in between two boys' twin beds. I was planning on doing Annie Sloan French Linen, but after seeing this and reading this, I'm hacking your hack! I have grey latex paint I can use and will clear wax it. And the pulls and your modification of them are wonderful! So lovely!!
This is amazing! I have a sideboard that I want to give this sort of look to and I'm so grateful I found this post! It looks awesome 🙂
Love this color combo! I painted my nightstand with the same 2 colors you used & it came out so nice. Now I just need to spray paint the hardware & it'll complete the look. Thanks so much for sharing!
This looks great! I am interested in painting a Tarva dresser and a dining table with similar method. Is it fairly straightfoward to just start with the darker color and then use some of the lighter one while the first one is still wet? Thanks!
Thanks! I just waited until the first coat was dry and then just kind of dry-brushed the second coat on.
Hi Jennifer-
I love your home and your products! I have almost all of your 24×36 chalkboard prints and used your tutorial to make my frame {and many subsequent frames as gifts!} I came to this post looking at more substantial nightstand ideas for my master bedroom re-do, however….it is the LAMPS that I am salivating over!!!! I see the comment above where you said you have no other info on them since you didn't save the tags. Would you mind to take a peek at the bottom of the base to see if anything is imprinted on them that might lead me to finding more of these gorgeous lamps? I would be ever so grateful. :o)
Thanks, Cindy! We checked the back of the lamps and they say TLC Home (tlclighting.com).
This project is really Amazing.Your Unique Bedroom nightstands look very beautiful. I especially like the way you nixed the skinny legs for bun feet, and the pulls look really cool.
I love your blog and the way the nightstands turned out. So pretty! I was wondering, how many coats of the dark you put on before brushing on the Sea Haze? Did you dry brush just the Sea Haze? And what paint sheen did you use? Satin? Matte? Eggshell? I appreciate your time!
Thanks! I'm pretty sure it was just one heavy coat, but they were sample cans so they didn't really have a listed sheen.
im looking into something similar to this for our bedroom and would like to skip the leg part all together and do something like the bun feet that you done. Did you have to attach anything else to the frame to get the silver plate to work?
Hi! We didn't take any steps or attach anything else beyond what is shown in the tutorial!
Hi…enjoy your dresser re-do. Could you tell me what size are the bun feet…all I have been able to find are about 4-5 inches in diameter and that seems too big for the project. Thanks for sharing your creativity.
Hi, Margaret! Jenni didn't know the exact dimensions, but she thinks they are between 3-4 inches in diameter. Hope this helps!
-Jason
Hello! As the Hemnes 3-drawer dressers have been recalled due to tipping, I'm on the hunt for an alternative. This is really a very clever hack, and I'm game to give it a try! I'd love to know how much time you spent altering this piece? Thank you!
Hi, Leanne! Jamie says it took about 45 minutes to build and then about an hour or so to paint.
-Jason
Thank you for the helpful tutorial! I just bought 2 rast chests and will be trying the same technique. Few questions, did you and or use a primer before painting? What size screws did you use for the hardware? And do you think the I'll have enough paint if I buy 1 sample of each color to do two chests?
Hi There!
These are gorgeous! I am going to redo some myself this week and was wondering, did you drill new holes in for the drawer pulls or just screw them in?
Thank you so much!
Jessica
Thanks, Jessica! Jenni just went and drilled an extra hole for each handle, which seemed to work pretty well.
Hope this helps!
-Jason