
I hope you all have had a lovely week. It has been a busy one here as we have been busy working away on our new website which we plan on launching September 1st. Jason has been knee-deep working in HTML and CSS and he also just added a twitter page for us (@dearlillie). You can find a link for it on the top right side of this page or you can just click here. I am not still entirely sure how twitter works so it may take a little while before I figure out how to properly use it, but he has convinced me to give it a try. We also moved the link to our facebook page from the navigation bar at the top to the button list in our top right corner.
I have two tutorials done up for projects we did in Jamie and Josh’s great room, one for the silhouette pillows and one for the burlap vases. I will show you the burlap vase one today. This was Jamie’s idea; she made some of these for her den a while ago and then we made a few more for her great room last week. I have always had a particular weakness for are vases but unfortunately, they can be rather expensive. This project, though, was incredibly easy and super cheap. It only took about ten to twenty minutes and I think cost less than two dollars per vase.
To view all of our tutorials, please visit our new tutorials page!
1) First cut as many strips of burlap as you plan on doing vases.
I cut quite a few to play around with. Mine were about 4 inches tall and maybe about 18 inches long to start with (although I trimmed down the length once I was done).

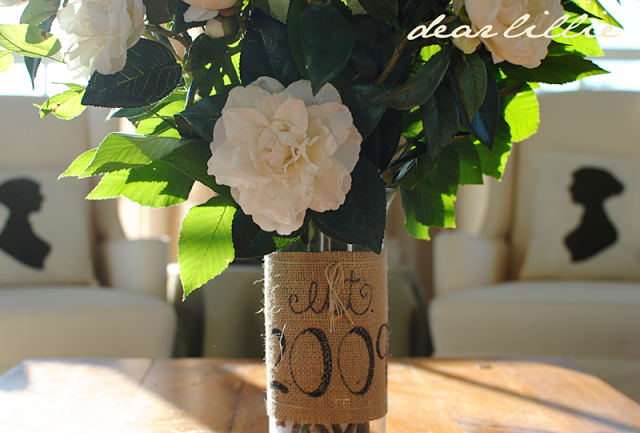
2) Using a sharpie write whatever you want on them.
A simple number that has meaning works or a monogram.
If you are patient go over the sharpie with black paint. It will make it pop a bit more. I always say I am going to do that but never get around to it. Maybe someday….


3) Now trim it down to the right size for your vase and tape it around your vase .
(You will remove the tape in a minute). In this picture I put the tape a bit higher than I meant to. You will want to put it lower so that once you tie the string on it you can easily remove the tape. Also, they always have basic cylinder-type vases at the dollar store or a craft store that work well for this type of project and help make it very inexpensive!

4) Now get out some string, twine, yarn, thread or whatever you have on hand.
We used a very thin tan colored yarn.

5) Now tie your string around the top and bottom of the burlap and remove the tape.

6) If you tie it in the back you can trim the extra string as shown above or you can tie it in a bow as seen below.

And there you have it! Here we did one for my mom and dad’s mantel and put it on an old jug.


And we did this vase for Jamie’s house.


It also works great for candle holders as well!

And here are a few pictures of Lola and I that Jamie took of us at the farm stand yesterday.


I hope you all have a fabulous weekend!


Love the burlap! That is such a great idea! Thanks for sharing!
Lindsey @ I'd Rather Be Crafting
Really….super cute! I love the affect….and I love sihlouettes!
LOVE this idea Jennifer! Lola is getting so big these are great pictures. Enjoy your weekend, Martina
This is so cute & looks pretty easy!! Thanks for sharing!
What a a great project! Simple and inexpensive, but so very pretty! Thank you for sharing it with us! Oh and I love those photos of Lillie loving on the dog in one of your past posts. They are such sweet pictures! I really think some kids are born with a deep love for dogs. My toddler goes nuts for them and always has.
Wonderful. Beautiful work, congratulations.
good weekend
So pretty and seems so simple~the things you do best!! Baby lolabird is soooo sweet.
These are so pretty and look so easy to make! Thanks for sharing your great ideas. I definitely plan on making a couple of these to put around the house! The pictures of you and Lola are beautiful. It is amazing how fast babies grow…
Very cute! I will definately try this out. Sure wish I could put est 1981 on mine, but alas, it's the groovy 70's for me.
Hi Jennifer!!
Those are so cute!!! I LOVE them!! They would be perfect for my very first link party!!
It's called Show Me How!!! ~ Friday ~ Tips, Tricks, & Tutorials ~ No. 1 ~
It's going on RIGHT NOW!! and feel free to link up as many as you want :))
I hope you'll consider attending!! I would be so honored to have you participate!!
I love the pictures of you and your sweet baby girl!! You're both just beautiful :))
LOVE FROM TEXAS!!
~~Michella~~
http://www.michellamarie.com
~~~~~~~~~~~~~~~~~~~~~
GORGEOUS! Super easy..and affordable. Now those are the kinds of decorating projects I need!!! Thank you! Marissa
i need to do this! i love this look!
Thank you, Jennifer.
I am definitely going to make a few this weekend.
Baby Lola is gorgeous! Have a great weekend with your family.
Karen M.
first of all, you and lola are beauties! what a rare moment for us to see you!
second, loving the tutorials page! i so need to set this up my blog, i feel like i am always searching in the edits pages for a certain tutorial or recipe, would be nice to have it all in one place! off to check out a few of yours! i have an idea i want to do for my lola's room and i think i spied something on that page!
have a great weekend!
Love it. Will be trying it soon. By the way, I was able to get those big glass vases that pottery barn sells at Big Lots for $4 each….
Love the pictures of little Lola and you, she is getting bigger by the minute.
Kristel
Great project, as usual I can't wait to try it!
Thanks so much. Have a great a weekend…
That is such a super cute idea!!!!! I have to ask… how did you get your comments to show the numbers next to them???
xo,
Karen
Karen, I actually couldn't figure out how to do it myself so I had a blog designer do it. When I have a second I'll try to find the link to her site.
love. love. love this. and the 2 of you are darling!!!
saw the the blog in the magazine. super fun, congratulations.
Wonderful post. You really came up with some creative ways here in blogland..great job!
What a great tutorial! so cute! And your girls are just beautiful! Love those pics of you and Lola!
So cute! You have the neatest handwriting!!! I must say, it was very nice to see you in front of the camera! Have a great weekend!
These are so cute, I am going to have to try this for my entry that has nothing on it. Don't know that I can just free hand with a sharpie but I will do my best. Always love the stuff you do, I used one of your tutorials this week for a baby shower and everyone love the cupcake toppers I made.
How sweet is that! What a great tutorial! I'll have to give it a try very soon.
Lola is really growing. Amazing and yet a bit sad how quickly time goes by. How you find time to blog at all I have no idea.
Have a great Monday, Jennifer!
First time I've seen you – you are as lovely as your littles.
Great idea. Great tutorial.
xo
babymama
Love the Evy's Tree matching Mom and daughter ruffled jackets!! So cute! I would love to win!! Thanks for posting!
Shae:)
shaepreuett@msn.com
btw I made the ruffled lampshade for my daughter and I love it!!! Your blog is one of my favorites:)
super sweet project! you and your daughter are beautiful! susan
Love this idea! Saw it on Tip Junkie and had to come check it out.
So simple, yet beautiful! Love this idea. AND, what a little sweetie you have there! She's adorable!
So sweet and simple! 🙂