
First, let me warn you that this is the first of several tutorials involving Jane Austen that you will see in the coming weeks. Second, this project is so much easier than you would think. Until this past year I have always avoided projects that involved interfacing because I thought they sounded way too difficult and confusing. Well, a few months ago when I was working on something for Lorelei’s nursery I decided to finally give it a try and realized how easy it was. I can’t believe it took me so long to attempt it!
To view all of our tutorials, please visit our new tutorials page!
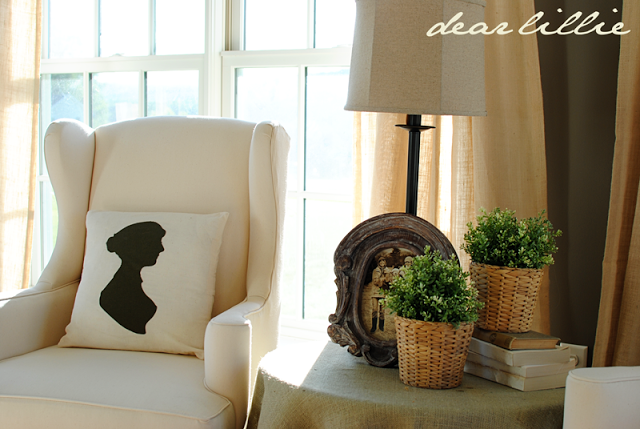
Here is one of the finished pillows:
Now here is how to make it:
1). Purchase some iron on adhesive

2) Find the fabric you want to use.
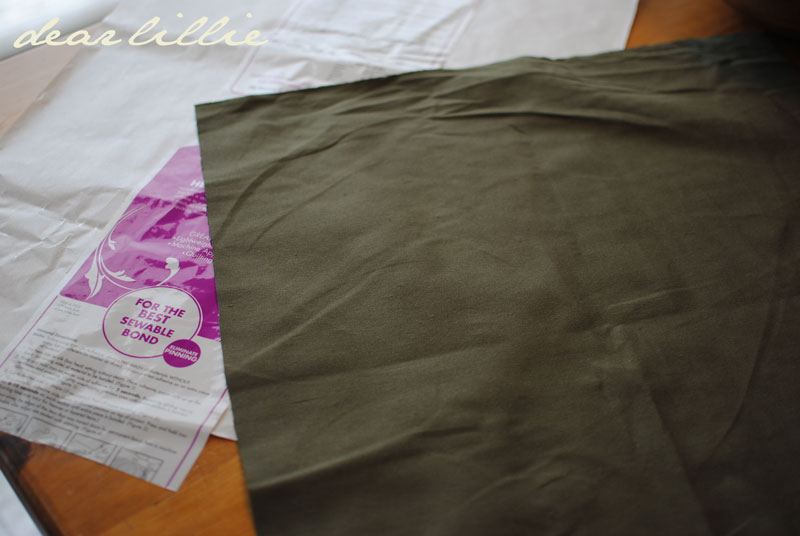
3) Now follow the directions on your interfacing and iron the fabric to the interfacing
until they are fused together.

4) Next trace your silhouette or whatever design you would like onto the paper side of the interfacing.
(To get your silhouette you can either print a design out from your computer onto cardstock and then cut it out or use a silhouette machine to cut it).

5) Here are the traced out images.

6) Now cut out the images.

7) Flip them over to the fabric side to make sure you are happy with them.

8) Now just peal off the paper off the back of the interfacing.

9) Press into onto the front of a blank pillow cover.

10) Iron it on

11) Now stuff your pillow form in and there you have it!


If you want one but don’t feel like making it we will be selling 18″ by 18″ screenprinted versions of this pillow (both facing left and facing right) when we reopen September 1st.
I also want to say a quick Happy Birthday to my youngest sister, Jamie! She is 25. We are having a little party for her this weekend and have been working on some fun projects for it. I will have photos of that along with some more tutorials next week. Anyway, here she is with the girls and they are all wearing Evy’s Tree hoodies. We will be giving away one of their beautiful items here on our blog on Wednesday so be sure to check back and enter!


I can certainly see this tutorial being used in a variety of ways. I am certainly going to attempt to try it.
Rashon aka Mr. Goodwill Hunting
http://www.ilovethrifting.com
That does look easy! The girls look adorable in pale pink. Time flies, and one day they will turn 25 too!
Thanks for such an easy tutorial! I will definitely have to try this now ~ I can't wait to see how my projects turn out!
B
http://sassafrassandsouthernness.blogspot.com/
How did you get the Jane Austen Silhouette so large (did you enlarge on a photocopier??). Do you have a link for that particular silhouette? Thank you for the tutorial, the pillows are lovely! Oh, to be 25 again. I remember feeling so old when I turned 25, well, now I'm almost 37 and I feel ancient =P
your babies are beautiful! must try this, great post 🙂
This is a great tutorial, I wish I had thought of this when I did a silohoutte on a chair. I'll be tring this soon, thanks Jennifer.
What about Dana? haha I thought she was your youngest sister?!
lovely thank you for sharing. Hugs!
love the pillow! so cool of you to share the tutorial,
thanks….
love it on the chair.
Karen
Thanks everyone!
Andrea – I drew it in Illustrator and therefore was able to resize it to exactly the size I wanted. I would think you should be able to blow it up on a copier quite easily, though!
Kaitlyn – Dana is one of my two younger sisters but not my youngest sister. Jamie is the youngest girl in our family.
Interfacing seems so scary, but it really makes projects so easy. I think I might need to make something similiar with profiles of my girls.
Happy Birthday to Jamie! Beautiful photos! Thanks for sharing your tutorial. It does sound easy. The Jane Austen pillow would be a fun birthday gift for my sister-in-law.
Happy Birthday to your Sis.
Also I wanted to thank you for sharing this tutorial. What a lovely gift this could be.
I have a cricut so it is easy to cut out the silhouettes in whatever size.
Since I discovered your blog every day several times come see the beautiful things he has.
Can I get an idea for me? I loved the crepe paper flowers for my daughter's closet. I like to do? The branches where the flowers is placed paper paste?
Thank you. Good week and kiss to all
google translation, excuse the bad English
The girls all look adorable in that great hoodie! I'm so glad you had this project today – I had purchased a pillow cover that I wanted to put a Whippet dog silhouette on – now I know how 🙂 Also, thank you for that burlap vase wrap idea. I made one that Friday for a dinner party we went to and I also made one for our house. I was surprised I could actually make it look good! I'll probably post it this week. Have a great day!
Love that pillow! I've always wanted to make these of my kids' heads. :O)
I just dropped in to say…those pillows are GORGEOUS!!!!
Hi Jennifer! Thanks for sharing how to make these wonderful pillows. Looks like I will be buying interfacing soon. Your girls are so precious.
xo,
Sherry
This is such a beautiful and elegant project. I'm sharing a link to your post on my Facebook page. Thank you for the excellent tutorial!
Jenn/Rook No. 17
Oh. My. This is inspired gorgeous! My sister and I had our silhouettes taken last summer at a Jane Austen Festival. Guess what I want to do next?? 🙂
Dear Jennifer,
I love these pillows and I am excited to try and make my own from your great tutorial. However, I cannot seem to locate any blank pillow covers that I love. Do you mind me asking where you get yours? I love the color/texture of them qne they are a nice nuetral fabric. Thank you for taking the time to get back with me! I know you are busy prepping for the re-opening of your shop. 🙂 Susan
Thanks for the tutorial! I made my own and posted them here… http://thisisnotaroughdraft.blogspot.com/2011/08/living-room.html
Love, love your blog and style!
I just checked it out Alison – you did a wonderful job!
Thank you so much for this FANTASTIC tutorial. I was able to make 6 grandparents day gifts! http://ashe01.blogspot.com/2011/09/happy-grandparents-day.html
Thank You,super:)
where are the curtains from? I love the color of the curtains against the paint color.
The curtains are my sister's, they are from Ballard Designs
Dear Lillie, I hope you don't mind that I made my own version of your Jane Austen silhouette pillow and did a blog post about it. I just adore your pillow and your entire blog for that matter! Your style is so inspirational! Thank you, ~ Jamie http://domesticallyspeakingjamie.blogspot.com/2012/04/jane-austen-silhouette-pillow.html
I hopped over from another blog that had used your tutorial to make a bag or two with Jane Austin profile. I think, even I could do this so I'm going to give it a go!! Thanks for the ideas. I think I'll be a frequent visitor to your blog as I really want to get out of a rut and make some things for myself. Looking forward to learning so much more and….thanks again. Joan
Ah ha!!! So smart. Mary