

Have you ever had a project go horribly wrong and had to come up with a completely new plan? Well, our dining room table project turned out to be a fiasco. A few hours into my “great idea” I was thinking it was my all-time worst idea ever! Fortunately, after a change of plans (and a few more days of eating on the couch than I’d anticipated) we now have a farmhouse table! Now, I have to say that was NOT the original plan.
When we first moved here to Williamsburg our tabletop got quite damaged by the movers. To salvage it I just quickly put a coat of Ballet White over the whole table which covered most of the scratches and dings. Over the years I continued to add coats as needed and finally it was starting to get a pretty lumpy finish. I decided to strip and sand the whole piece down. I figured if the wood was pretty underneath I would just stain it and see how that looked. I figured it might be fun to change things up a bit. And then I figured if it didn’t look that great I would just add a fresh coat of Ballet White and that would be that.
I always loved our dining room table. I liked the pedestal base and the oval shape. The only complaint I had
about it was that it was a hair too wide for the space which meant we
had quite a few run-ins with the chairs sticking out too far. I had pondered looking for a
more narrow farmhouse style table but we really didn’t need a new table
and there are quite a few other things on the list that I would rather be saving up for instead. I looked at some
tutorials online but was too scared to actually try to make my own, so
pretty much just pushed that thought aside.

I had stripped a few other pieces in the past few months so figured this one would be just as easy! Not so much…Ugh! It was AWFUL!!!!!
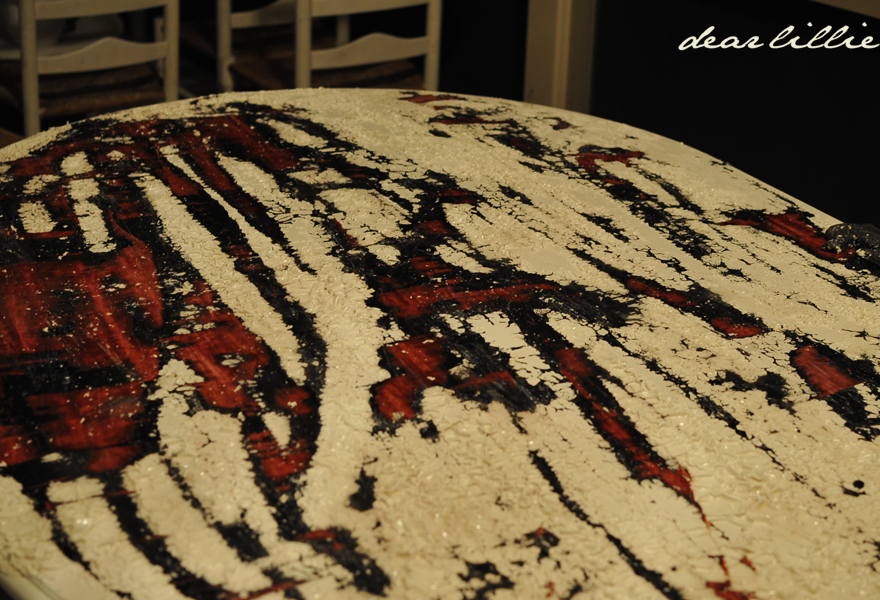
After two days and four rounds of stripping it I threw in the towel. The
worst part was the wood underneath was purple toned and patched
together so weirdly. At this point because I had taken over the porch
where we often eat and moved our table out there we had nowhere to eat
for a few nights. I got impatient late the second night and didn’t
finish sanding because the girls needed to head to bed and my sander is
loud, which was another mistake. Once they were in bed I decided to just go ahead and paint it, instead of waiting until the next day to finish properly sanding it. I
used the last bit of Revere Pewter I had and well, it really wasn’t
ready to be painted yet so it didn’t turn out that great. I did
discover, though, that I loved how the Revere Pewter looked and I really
liked how the table looked out on the porch! I looked so much better
than the little one we had out there. I started thinking about it and it seemed
like such a waste to have spent two days working on a table just to
bring it back in not looking that different, but by keeping it out one
the porch it seemed new and more fun! So, we decided to keep it out
there. I will show you some pictures of it soon. It has been really
practical too. We eat out on the porch quite regularly and that table
works out there so much better than the small wire one we had out there
before. It’s not wobbly and we can actually set all of our food on it!
=) However, that left us with no dining room table.
I had a few boards leftover in the garage and laid them out and thought it would be pretty easy to make a farmhouse style table top with them but wasn’t sure how I was going to make the base. I decided to check out some of the tutorials I had seen and kept coming back to Miss Mustard Seed’s. Her table was so beautiful and her directions seemed easy to follow but I was a little scared. I’ve fixed up some furniture pieces before but never built something from scratch. I figured it would be easier to find an old base and then just attach the top I was making. Well, after hunting on Craigslist for a few days and then spending a day with the
girls hunting through all of the antique malls and consignment shops in
Williamsburg I gave up. The only things I could find were either way too
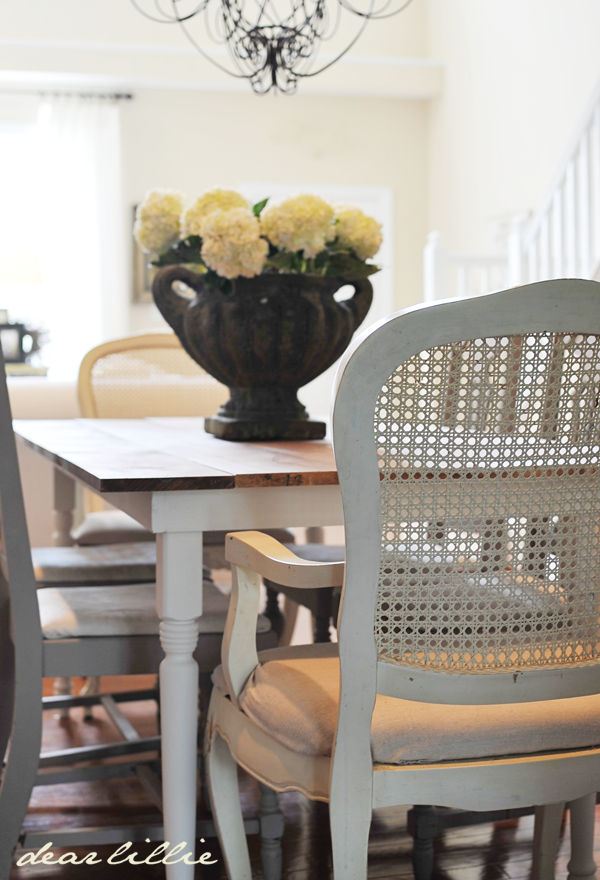
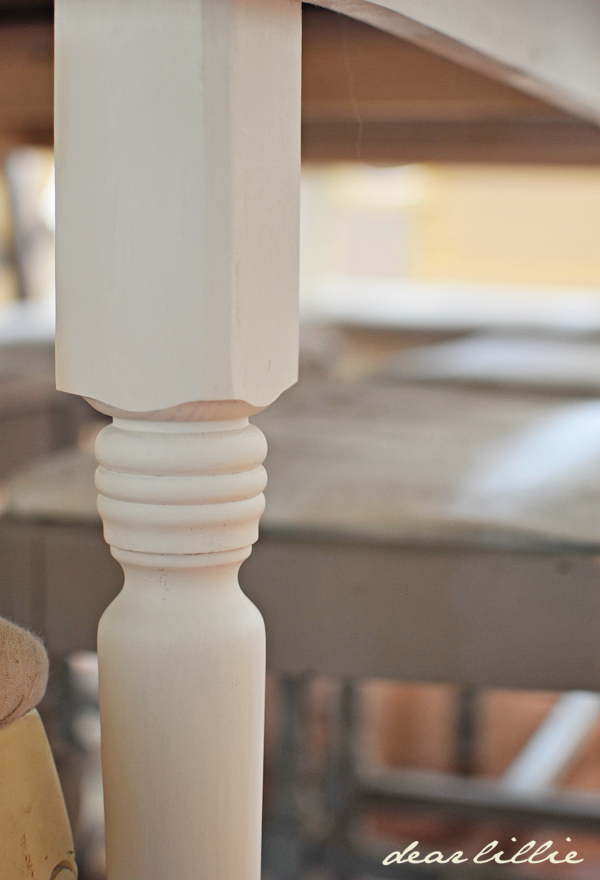
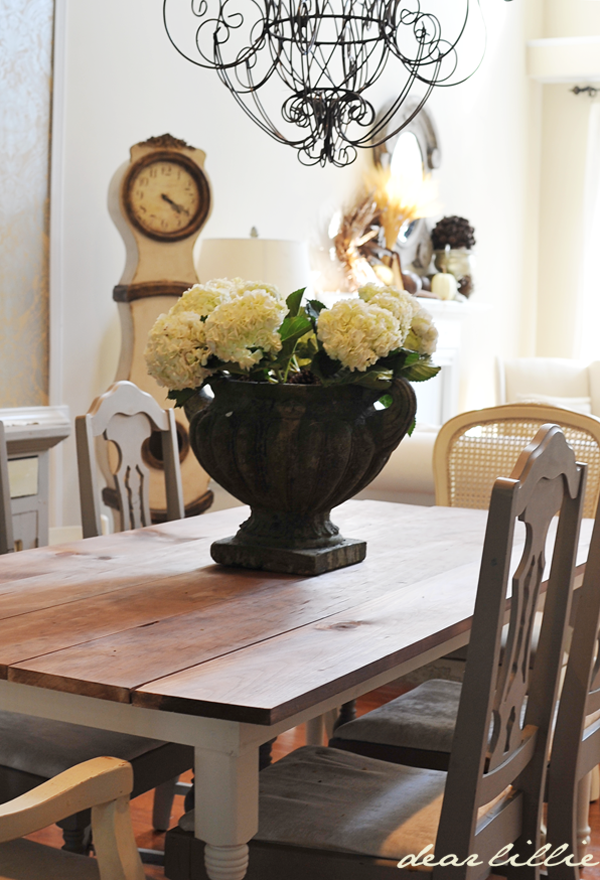
expensive or not the right size. I headed to Lowe’s and purchased some lumber, a drill, screws and four legs and decided to give it a try. After every other step of this project going horribly awry, something finally went right. I can’t believe I am writing this, but not only did I get the table built it was FUN! Seriously! I want to make another one! It only took me about an hour and a half to actually build it. And then the following day I spent another hour or two adding the wood filler, sanding and painting the base. It actually isn’t completely finished yet. I still need to sand and round the corners a bit so we don’t have any injuries seeing how Lola and Lillie fly through this room like crazy little things, and I need to do something to protect the table top. But we finally have a usuable table in here again – yay! And its only 36″ wide! Our other table was about 48″ so this new one fits so much better in our narrow little dining room!
If any of you have been pondering building one of these I HIGHLY recommend using Miss Mustard Seed’s tutorial! I made my top using different boards than hers but followed her instructions pretty much exactly for the base. Now, mine is far from perfect (I split the wood in a few places, and I was doing it by myself and didn’t own a clamp so its not 100% aligned), and I learned quite a few things as I was going (like how important it is to make sure you screw all the screws in all the way – kicking myself about that now), but all in all, it is quite rewarding to know that I built it all by myself and even though it is lightweight (I moved it back and forth from the dining room to the porch myself several times while working on it), it is really quite sturdy!
So, even though when I started this project I had no intentions of moving our dining room table out to the porch and building a new table from scratch it’s a fun little change! And if I decide this looks a little too rustic for me I can always swap this one and our other one on the porch.


I hope you all are having a wonderful week!


Your table turned out absolutely beautiful! It is just perfect for your space.
Beautiful work, Jenni! You amaze me yet again! Emjoy your new table!
The new table looks great and love its style.
Nice job! The table is beautiful. You are an inspiration.
Ooo look at you, Ms Handy…:) thanks for the encouragement …I've been wanting to make one since Courtney from French Country made one too…need to check out Ms Mustard Seeds'…..have a great week…xo
It turned out fantastic … way to go! Just might have to take a peek at MMS's tutorial.
I've stripped a few pieces of furniture that have turned out to be a nightmare. I've decided that while the actual process of stripping isn't my bag, the results are (usually) worth it. I'm sorry your table didn't work out like you had hoped, but the new table is wonderful! I like the wooden top in your room, and love the urn you placed on it.
Looks fabulous Jennifer! I want to replace the top of our dining room table with planks but not sure hubby will go for it. Love your newly made one!
I am in the same situation. I really messed up my table trying to strip and sand it. I thought it would be cheaper then buying a new one but I think I may build one. It's probably easier then searching for the perfect size. Great job and I'm shocked as too how much it changed your room.
I am in the same situation. I really messed up my table trying to strip and sand it. I thought it would be cheaper then buying a new one but I think I may build one. It's probably easier then searching for the perfect size. Great job and I'm shocked as too how much it changed your room.
I love it when a project goes bad only to reveal something even better! I love the new table and its something you can be proud of b/c you made it with your own two hands!
Also wanted to tell you Im sitting here this morning with my cup of tea and reading the BH&G Christmas Ideas magazine that has your beautiful home in it all decked out for the holidays! So inspiring and lovely!!!
Thanks, Amanda! I am jealous – I haven't gotten a copy yet and am itching to see one! =)
The photo of your new table is lovely. The color of the table and your writing and the light. It was a wonderful choice. I really like it. Also, a big urn on a table has always caught my eye so again, the choices are beautiful to the eye. Thank you for sharing the resources for your inspiration! Now, where can I have a mishap on my table. Oh, that's right,I have one sitting in my garage right now, and maybe another one hidden somewhere in my pile of projects. Great, great kudos to you. Karen
The picture of the new table is pretty amazing, i hate when a project just won't come together.
Jan @ door251.com
LOVE the new table! You did a fantastic job, and I love the urn with the hydrangeas on it.
Liz
Oh my gosh, Jennifer! Now you are a FURNITURE MAKER!!! This is a really beautiful table. I really like the rustic top with your dinning room! Very impressive… I mean you!
Your table looks fabulous! Wow! Your urn looks lovely with the Hydrangeas in it too! Great addition!
YOU are awesome!!!! It look beautiful and how cool to walk by and think, "I did that!"!
I'm quite impressed with your table! Great job! It looks wonderful1
You are so talented, that table looks amazing!!! Are you guys still trying to move? We were down your way a few weeks ago, next time when we plan a little better I would love to meet up!
Kat
Oh that would be fun! No, we took our little sign out of the window. We never ended up getting a realtor. We just mentioned it on the blog and put a sign in our window (you aren't allowed to put them out front in our neighborhood =(…) to feel out the waters a bit. Next summer I think we will get a realtor and actually really try to sell it.
wow, great job, and you're brave to tackle that on your own!! love the rustic farmhouse look!
I love the update to your table! You have such beautiful taste and inspire me!
http://charminglittlelifeinphilly.blogspot.com/
You made that?! That's SO AWESOME! I want one!! 🙂
I love the look of farmhouse tables. You did an amazing job!
I Love it. It picks up on the wood on your clock. Really proud of you.
WOW!!!
I love it = what a neat and awesome story, too.
Can't wait to see your oval one on your porch.
I SO need a new table in my kitchen.
Well done!
Your table is beautiful..
Great job..
Oh my gosh! You did that!?? Way to go! It looks great, and how totally cool that you can use the other one on the porch. What a great story, and i know you must feel pretty darn pleased with yourself that you made that cute farmhouse table, i sure would be!
Cindy
Gorgeous table….beautiful job…so love the new look that it gives the dining room.
Absolutely lovely and you deserve a BIG pat on the back. Heck, just go ahead and hug yourself. I love the table and am thinking that I might need to ride in your rodeo and give it a round myself. Our current table is one that The Husband purchased at a garage sale for a mere $10. It has served us well, but it might be time for it to find another home. Thanks for a great post that has me pondering….a trip to Lowe's!
Jenni, I LOVE it! Okay, I'm officially inspired! Kevin has been wanting to add wood planks to our existing table to give it the farm house look, and I've hesitated. THEN, we watched Sarah's House over the weekend {SO good, by the way!} and she made a coffee table using the same concept, so it got me wanting to try Kevin's idea. Now I see your beautiful table, and I have to try it! I may even start painting tonight :). I think I need that urn for mine too – ha! Is it from around here by chance? Also, as for your pumpkin dilemma, I had the same dilemma this time last year. I seem to recall they were at the next farmer's market though – so hopefully this Saturday you'll have better luck!
Oh I LOVE Sarah's House! She's my favorite designer on TV now. It used to be Candace Olsen but then once I started watching Sarah Richardson she took over the top spot =). You should try the table. It seriously was so much fun and much easier than I thought it was going to be (unlike stripping the other table which was much harder than I thought – haha). The urn is from a store in Florence. It's funny about the pumpkins. If it weren't for blogging I would be fine waiting a few more weeks seeing how it's still so hot out. I will be gone this weekend but hopefully when we get back they will have some. I hope you and the girls are doing well!
Love this! You did a fantastic job. It looks so good in your dining room. What kind of wood and stain did you use?
I've had the wood for the top in my garage for months so I can't remember what type of wood it is, and I think the stain was called Provincial.
THIS IS A WONDERFUL PROJECT, YOU DID THE GREATEST JOB FOR YOUR FIRST TIME!! YOU KNOW THE BEAUTIFUL PART OF HAVING A FARMHOUSE TABLE ARE THE KNICKS AND SCRAPES THEY ACQUIRE OVER TIME, JUST RUB A LITTLE MINERAL OIL ON IT FROM TIME TO TIME AND YOU'LL LOVE THE WAY IT AGES. JUST THINK OF IT THIS WAY YOU HAVE CREATED AN ANTIQUE OF THE FUTURE WITH YOUR OWN TWO HANDS!!!
Well, it turned out great. Can't believe the other table was that hard to strip.
Love love love this. I can't believe you built this. I love the chandelier too. Would you be willing to reveal where you found it?
Thanks Kara! My chandelier is from a store in Williamsburg called Savvy. I know they aren't able to get any more because I tried to get one for my sister. However, last winter there was a similar one on Wayfair's website. We actually featured it in our curated Joss and Main event. I'm not sure if they still have it but it would be worth checking.
Love it!!! Everything well put together including the chandelier!
One day your darling girls will read this post. They will know all the time and hard work you put in. And the most valuable lesson is you never gave up. Your perseverance was rewarded. The memories your create at your beautiful new table will last forever… and hopefully one day your table will be passed down and think of the stories it will tell.
Love, love, love!!!! You are so inspiring! Did you paint a lot while you were pregnant? I have so many projects now that I want to do, but found out that I'm 6 weeks pregnant (SO excited!) and not sure if I should hold off, or if Benjamin Moore is a safe paint for me to use (with a mask).
Thanks!
Congratulations! Yes, I painted non-stop while I was pregnant with both girls! I used Benjamin Moore's Aura line which is supposed to be completely safe.
what is the paint color on the table legs? It's so pretty & soft.
It's Ballet White by Benjamin Moore.
Wow! Good for you… that table looks great! Just went to the store and bought a drill and the other parts… I love it!
~Lori
Good luck!!!
Looks gorgeous!!! I'm currently having my own farmhouse table saga!!! I love the color of your gray chairs, did you paint those? If so, what color did you use? Is it BM Revere Pewter? I love everything on your blog, you are so talented!
~Heather
Thanks you, Heather! Yes, I painted them too. They are Ashley Gray.
I love all of your darling pillows!!! This is one of my top favorite blogs! thx for sharing!
eventivedesign@hotmail.com
Love it! <3 Hannah
http://welivedhappilyeverafter.blogspot.com
There is a wide variety of farm style dining table online like the genuine antique farmhouse tables, or the reclaimed wood farm table and the newly manufactured rustic farmhouse tables
Farm dining room tables
Love your blog! I've just ordered my farmhouse table online, can't wait for it to be delivered.